Die Double Take I: Elizabeth

Don't adjust your computer screens.  You will not be seeing double.  It is our next event showcasing our POV's (Point of Views) of how the same same die cut can be used in two totally different colorful designs. 

Penny Black Creative Dies 51-137 Swirling Wings and 51-132 Flights of Fancy

Today I am fluttering by with a card that combines both Swirling Wings and Flights of Fancy.


Here's a look at how this card was created.

Using 51-123 The Garden, emboss the design on a 3 x 5-inch piece of white cardstock. 
Ink the edges with Delicata Golden Glitz ink and adhere to 
a 3 1/8 x 5 1/8-inch piece of white cardstock.
 Attach the matted piece to a 3 ½ x 5 ½-inch card base with dimensional foam tape.

Die cut 51-132 Flights of Fancy from white cardstock and ink with 
Dandelion and Love Letter Memento Luxe inks. 
Die cut 51-137 Swirling Wings from black cardstock.

Working in small areas, apply Fruit Punch Stickles to the die cut and 
sprinkle with Carnelian glitter. 
Once dry, add Espresso Dimensional Pearls to the body and antennae. 
Attach the glittered wings to the inked body using a glue pen.

Die cut 51-114 Flower Portrait from white cardstock. 
Ink the frame with Delicata Golden Glitz ink and trim the length to measure 2 ¼-inches. 
Cut a piece of white cardstock to fit under the largest piece of the frame 
and sponge with Teal Zeal Memento ink. 
Stamp the sentiment (30-297 Sprinkles and Smiles) in black ink. 
Attach the frame to the sentiment by using a glue pen. 
Arrange the elements on the front of the prepared card base as shown 
using dimensional foam tape.


Stay tuned.  Coming up...Die Double Take II.


Die Double Take I: Jill

Don't adjust your computer screens.  You will not be seeing double.  It is our next event showcasing our POV's (Point of Views) of how the same same die cut can be used in two totally different colorful designs. 

Penny Black Creative Dies 51-137 Swirling Wings and 51-132 Flights of Fancy

Today I've combined both sets of dies to create a card with my favorite cardmaking focal point...butterflies!

I inked my large butterfly and background using Ranger Archival inks with an ink blending tool and foam pads.  The center panel was die cut from Penny Black Creative Die 51-055 Shades, and the sentiment, Penny Black 30-283 Snippets, was stamped using VersaFine Onyx Black ink.  Finally, this panel was mounted to cardstock stamped using VersaMagic Wheat ink and Penny Black 30-114 Puzzle Parts, creating a light chevron background.  

What has been fluttering around on Elizabeth's art table...coming soon!


Die Double Take I: Sneak Peek

Don't adjust your computer screens.  You will not be seeing double.  It is our next event showcasing our POV's (Point of Views) of how the same same die cut can be used in two totally different colorful designs. 

Here's a sneak peek at our first featured dies...
Penny Black Creative Dies 51-137 Swirling Wings and 51-132 Flights of Fancy
See you soon, very soon, with the reveal of our cards!


Colorful COPIC & ART SQUARES Blog Hop

Welcome to the Colorful COPIC & ART SQUARES blog hop!  
You are in for treat today because here in the studio we are pairing up our Copics with our favorite Art Squares by Inchie Arts.  There are so many things to love about this pairing! 
Did you know...
Art Squares are the perfect canvas for creating small-format art!
They come in 6 sizes (1 inch, 1.5 inch, 2 inch, 3 inch, 4 inch, and ATC).
Art Squares come in 7 colors (black, dark gray, light gray, kraft, dark cream, light cream and white).
They are perfect for wet or dry mediums.  
Copic markers and inks look amazingly vibrant and deliciously rich on Art Squares!
Copic multiliners glide smoothly across the surface.
Work on the “top” or toothy side for the best results. 
You can mix and match your mediums! No warping, bending or curling.  

Now come take a closer look at each of our art tables...

Today I am working on a white 4" Art Square. I love this size because once the Art Square design is complete, it is large enough to be the whole card!

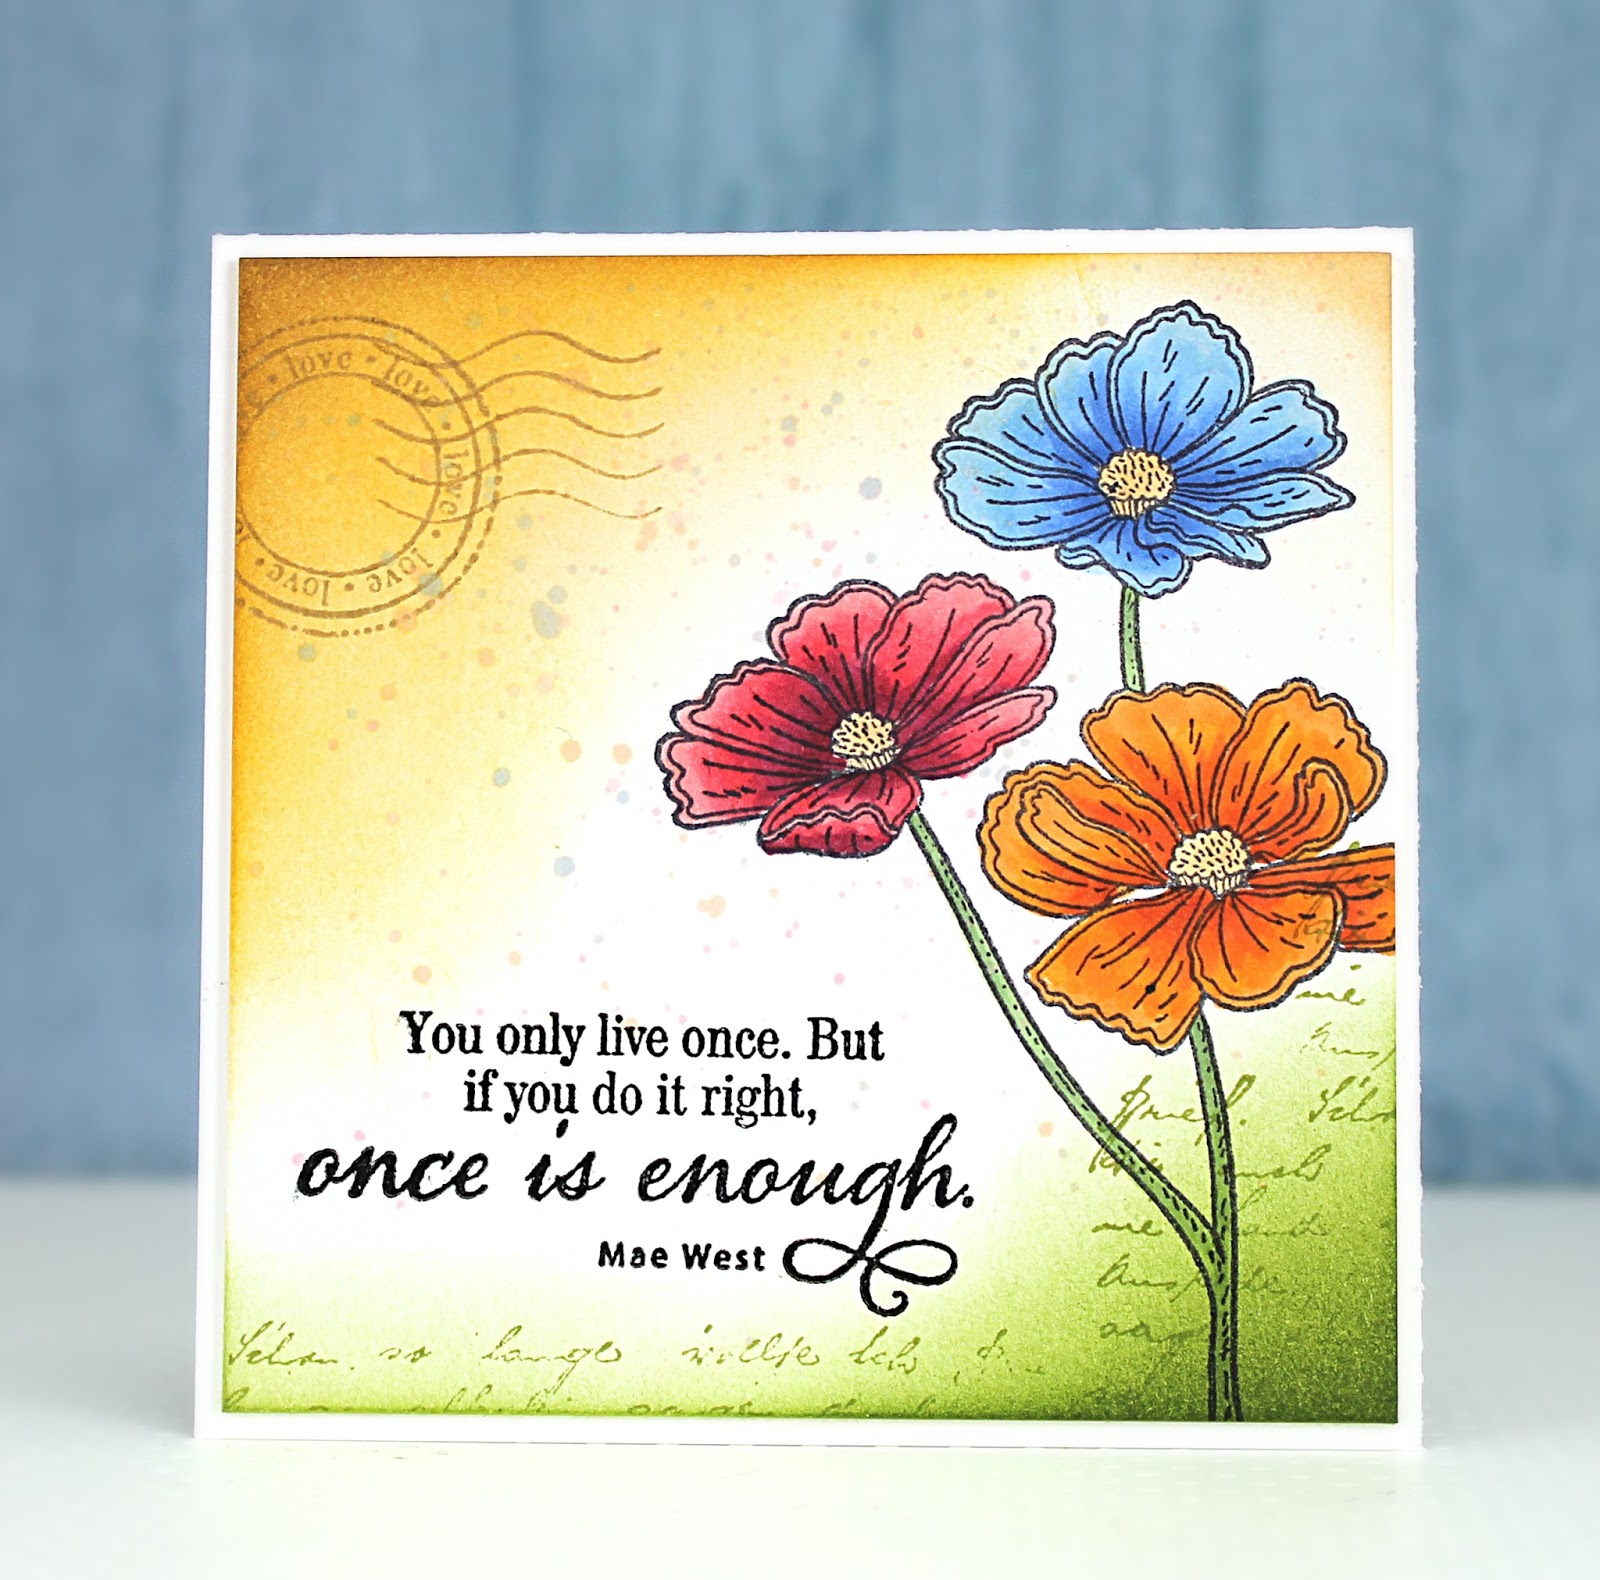
I stamped my image using Memento Tuxedo Black ink with Penny Black's floral set, 30-282 Efflorescence.  Then I got out some of my favorite Copic markers...perfect for coloring flowers!  Here are the colors I used: R39, R35, R32; YR18, YR16, YR14; B26, B24, B21; Y32; G85, G82.  Once my coloring was complete, I stamped my sentiment (Penny Black 30-286 Heartfelt) using VersaFine Onyx Black ink. Using an ink blending tool and foam pad, I added background inking with Ranger Archival inks.  Subtle background stamping was also added using Penny Black stamps, 30-274 Posted with Love and 1999L Letter Background. I love that Copic colors are so strong and beautiful, so even with an inked background, the shaded flowers stay bold and bright.  Oh, and those soft splatters? I added those using a mixture of Copic Colorless Blender and the same marker colors used to color the flowers. I just colored a small bit of marker color onto my acrylic block, added Colorless Blender directly from the refill bottle, and flicked on this "paint" using a paintbrush.


For today’s art equation of “Inchie Arts + Copic Markers”, I created a small canvas that contains a pocket on the reverse side to hold a personal note.


 For the front of the “canvas”, I trimmed a 4” white Art Square to measure 3 ½ x 4 keeping the trimmed part to create the sentiment later in the project.
The flowers (Applause 40-379 - Penny Black) were stamped in Tuxedo Black Memento.  Copic markers (R05, R29, Y19, YG05, YG09, YR16) were used directly on the Art Square to color the flowers and leaves.

For the background, a small bit of BG45 was dispersed from the refill bottle to a non-stick craft sheet.  Alongside the color was placed a few drops of Colorless Blender from the refill bottle.  Using a paintbrush, the alcohol inks were used to watercolor the background.

Using the leftover piece trimmed from the Art Square a smaller 3/8 x 1 3/8-inch tag was created.  The small sentiment (Snippets 30-283 – Penny Black) was stamped in Tuxedo Black Memento.  Both the small tag and larger “canvas” were edged with a black 110 Copic Marker.

Small red pearls accent the flower bases and an orange Atyou Spica Pen was used to add some twinkle.

On the reverse side, a pocket was die cut (A Pocket Full 51-053 – Penny Black) from vellum and attached using a glue pen.

The card insert was die cut from white cardstock (Shades 51-055 – Penny Black).  One small portion of “Applause” was inked with Lady Bug and Olive Grove Memento inks and stamped on the right side.  Copic marker BG01 was used to feather in a soft sky.  The same colors of Copic markers used for the flowers on the front were applied to this flower.

A quick sentiment (So Very Much 30-269 – Penny Black) stamped in black completes the tiny notecard.

[Supplies: Inchie Arts 4" White Art Square; Copic Markers:  BG01, R05, R29, Y19, YG05, YG09, YR16, 110, O Colorless Blender Refill, BG45 Refill, Orange Atyou Spica Pen; Penny Black: Applause 40-379, Snippets 30-283, So Very Much 30-269, A Pocket Full 51-053, Shades 51-055; Imagine Crafts/Tsukineko: Tuxedo Black, Lady Bug, Olive Grove Memento; Other: Vellum, White Cardstock, Adhesive]


Now be sure to hop along with these other talented designers for even more Copic and Inchie Arts inspiration!


And for more information about both Copic products and Inchie Art Squares, just follow the links below. 

Sakura Koi Watercolors; 6 of 6: Jill

Deep pools of aquamarine, ruby red and citrus orange (just to mention a few) are being splashed around the Studio.  Come jump in with us and get inky as we explore the wonderful palette of Sakura Koi Watercolors.

For more information about the Sakura Koi Water Color 
Field Sketch Travel Kit click "here".

Today I'm combining dies with watercolor...definitely a technique I will be trying again soon!

How about a step-by-step?
1. Die cut Penny Black 51-131 Harmonious three times from Neenah Solar White Cardstock.
2. Adhere all three layers together using Tombow Mono Liquid Adhesive.
3. Adhere thick die cut piece to Canson 140 Lb. watercolor paper.
4.  Paint directly onto watercolor paper and die cut.  Add additional layers of paint to darken die cut outlines. TIP: Use a small brush for small areas like the thin stems.  (Oh, and don't forget those splatters. :) )
5.  Stamp sentiment, Penny Black 30-283 Snippets, onto circle using VersaFine Onyx Black ink. Distress Edges with VersaMagic Wheat ink and Ranger Archival Tree Branch ink.  Adhere to card with dimensional adhesive.
6. Embellish with May Arts Twine.
7. Adhere watercolor panel to notecard using dimensional adhesive.
Thanks for joining us over the last couple of weeks as we painted up a storm here in the STUDIO.  We hope you were inspired to grab your favorite watercolors, stamps, and dies!


Sakura Koi Watercolors: 5 of 6: Elizabeth

Deep pools of aquamarine, ruby red and citrus orange (just to mention a few) are being splashed around the Studio.  Come jump in with us and get inky as we explore the wonderful palette of Sakura Koi Watercolors.

For more information about the Sakura Koi Water Color 
Field Sketch Travel Kit click "here".

One of the things I enjoy about art which makes my heart sing is that anything goes!  I get immense pleasure from pairing up different coloring mediums and building intense color.

Today I am combining the translucency of Koi watercolors and the opacity of Faber-Castell PITT Pastel Pencils.

I started by stamping the flower (Gentle Whisper 40-331 / Penny Black) in Desert Sand Memento ink on watercolor paper.  With the application of Koi watercolors the flower began to blossom into shape.

The addition of the PITT Pastel Pencils gave the flower definition. 

Gel medium was painted over the flowers to 
seal the colors and provide a subtle sheen.

The design was matted on Fall Festival Mix & Match Cardstock and attached to a white card base with dimensional foam tape.

A sentiment (Heartfelt 30-286 / Penny Black) stamped in Onyx Black VersaFine transforms this card into a birthday greeting.

Have a colorful day!


Sakura Koi Watercolors; 4 of 6: Jill

Deep pools of aquamarine, ruby red and citrus orange (just to mention a few) are being splashed around the Studio.  Come jump in with us and get inky as we explore the wonderful palette of Sakura Koi Watercolors.

For more information about the Sakura Koi Water Color 
Field Sketch Travel Kit click "here".

There is just something about the watercolor look that I fall in love with more and more each time I stamp.  I especially love how easily I can use the Sakura Koi watercolors for both painting in an image AND also for painting backgrounds as well.  

On today's cards I first painted my primary images/tags (Penny Black 40-328 Butterfly Party) and then cut them out.  I also added a few swipes of coordinating colors for the backgrounds...quick, easy, and fun!
I sure hope you are enjoying our puddle-y and splatter-y watercolor fun here in the STUDIO... I can't wait to see what Elizabeth has in store for us next week!


Sakura Koi Watercolors; 3 of 6: Elizabeth

Deep pools of aquamarine, ruby red and citrus orange (just to mention a few) are being splashed around the Studio.  Come jump in with us and get inky as we explore the wonderful palette of Sakura Koi Watercolors.

For more information about the Sakura Koi Water Color 
Field Sketch Travel Kit click "here".

Watercolors are a great way to bloom flowers in the winter!  
A quick splash of Koi watercolors on this blossom (Penny Black's Rain or Shine 30-236) and a little bit of fussy cutting and your flower is ready to go.  Simply layer it on a smaller piece of white cardstock with a free-style cut swoop, a sentiment (Rain or Shine) and an organza ribbon.

For my designs, I like to stamp the image in Onyx Black VersaFine on watercolor paper and heat emboss with clear powder.  It gives a nice, definitive edge to the fussy cut image. 

In the center of the bloom, a black brad was added for an embellishment.  The top accent strip is a white piece of cardstock that was water colored in blue and stamped with the butterfly from the same set in Cactus Green StazOn. 

Jill will be "fluttering" by soon with more colorful fun.