Studio Tips; 4 of 4: Elizabeth

The month of September has us thinking of back to school and learning new things.  With that in mind, we are bringing a brand-new feature to the STUDIO... 


Tip: Office supplies, such as binder clips, can be useful crafting tools!
  

They are wonderful for creating a vise.

Here a small brad is held steady for coloring and embellishing treatments.  A great alternative to using tweezers which require constant pressure to hold the item.  Plus the item can be left to dry without disengaging it from the clip which protects areas treated with inks, glues or glitter.


With the addition of a small piece of florist wire a hanger can be fashioned to hold buttons that have been treated with inks, glues and glitter and can be left to dry without either side being marred.


Here the binder clip is used as a clamp on the corner of a piece of chipboard that has been wrapped and covered with papers.  This is helpful to keep the papers tight and in position as the glue dries.

Tip/Hint:  Wrapping a small piece of clean white cardstock around the area before “clamping” helps prevent clip indentations from being molded into the paper as the glue dries.


The binder clips are also available in a wide range of sizes which adds to their versatility.  The small ones are adorable for card embellishments!


Studio Tips; 3 of 4: Jill

The month of September has us thinking of back to school and learning new things.  With that in mind, we are bringing a brand-new feature to the STUDIO... 


For my next tip, I am sharing my "secret weapon" when it comes to creating a one-layer (okay, I'll be honest, almost one-layer...haha!) background/card.  Here it is... Penny Black woodblock stamp, 1369L Postcard:
I find this stamp adds just enough texture and structure to the design to give it a finished look. 
Supplies and instructions HERE.

Supplies and instructions HERE.

Supplies and instructions HERE.

All stamps and dies by Penny Black.
Thanks for stopping by for some postcard fun!

Studo Tips; 2 of 4: Elizabeth

The month of September has us thinking of back to school and learning new things.  With that in mind, we are bringing a brand-new feature to the STUDIO... 


TIP:  Take die cuts to another dimension by cutting designs from coffee filters.


Studio Tips; 1 of 4: Jill

The month of September has us thinking of back to school and learning new things.  With that in mind, we are bringing a brand-new feature to the STUDIO... 


Am I the only one who is sometimes in the mood to stamp and color, but when I go to assemble my card, I get stuck?  For my first STUDIO Tip, I wanted to share with you one of my favorite design ideas/layouts that I turn to frequently when I'm just not sure how to "pull it all together."  Here's the sketch:

And here's a card using this sketch.
To create this card, I began by layering Penny Black's Creative Die 51-134 Flourish, onto white cardstock for a subtle textural look in the background.  The bottom portion of my card was inked with Leaf Green Ranger Archival Ink and then stamped with Penny Black 40-382 Blips using Spanish Moss VersaFine ink.  My focal point panel was created with an Inchie Arts White ATC Art Square (I love using this layout/sketch with my Art Squares!).  I stamped the flowers, Penny Black 30-298 Enamor, using Jet Black Ranger Archival Ink, and painted them using Sakura Koi watercolors. The sentiment, Penny Black 30-283 Snippets, was stamped with VersaFine Onyx Black ink.

Note: You can find more info about Art Squares on the Inchie Arts blog, website, and Facebook page.

And for an extra bit of fun, here are a few more projects I've created using this layout/sketch. It works with a die cut focal point...
...and for any style of card, from Valentine's Day to Christmas.

The layout/sketch also works for tag designs.

I hope you find this first STUDIO Tip helpful next time you might be facing a creative "block" but still want to get inky!  

All stamps and dies by Penny Black.

From This to That: Elizabeth

You never know when we will find something in the STUDIO that will inspire us to take a trans-formative artistic journey from this to that.  Come take a peek...


From Penny Black's Coco Style Designer Paper, Tombow's Hook & Loop Tabs and some fancy bling...


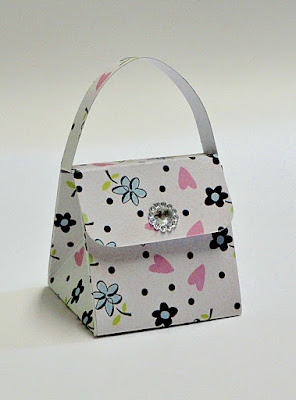
...to a fancy dimensional purse!
( 2.5  x  1.5 )
Simply trace your favorite templates onto 
patterned cardstock, cut and fold.  
Viola - instant cuteness!
  
What to add extra sweetness?  
Fill with chocolate confections.

I created this template design myself, but you can find many inspirational patterns on the web.

I really like the weight of Penny Black's designer papers.  Easy enough to score and fold with just the right amount of weight to keep the finished design sturdy and hold its shape.

Check out all their fabulous paper pads HERE.  
The design selection is amazing.