Gelli Plate Techniques, 2 of 4: Resist

Join us over the next few weeks as we explore making colorful prints using a Gelli Arts Gelli Plate.  We've even slid our art tables side-by-side and took pictures for you each step along the way!  Not only that, the fun continues as we share our “reveal” posts showing how our individual prints were transformed into creative projects.

Additional Gelli Arts Inspiration on their BLOG and FACEBOOK PAGE
Resist technique inspiration found HERE
Our next technique is one we just couldn't resist!


It really is fascinating how the Interlocking design looks so differently on each of our prints.  By using wax paper to cut her "stencil," Elizabeth was able to capture the delicate loops of the design.  Jill's print is more rustic and distressed because she used a thicker cardstock to create her "stencil."  

Will our project reveals have a similar look? We'll find out very soon...


Gelli Plate Technique 1, Project Reveal: Jill

Join us over the next few weeks as we explore making colorful prints using a Gelli Arts Gelli Plate.  We've even slid our art tables side-by-side and took pictures for you each step along the way!  Not only that, the fun continues as we share our “reveal” posts showing how our individual prints were transformed into creative projects. 

Additional Gelli Arts Inspiration on their BLOG and FACEBOOK PAGE
Basic technique inspiration found HERE
So today I get to show you what I did with my prints I created HERE.  I started with the two prints I had pulled on the NEW (and awesome!) white 4 x 4 inch Inchie Arts Art Squares.  The large matboard surface of the Art Squares was a really nice fit with the Gelli Plate. (Additional Inchie Arts information available on their BLOG and FACEBOOK page.)
 
Sooo... what did I create with these quite abstract prints?
Let's begin with the print on the left...
To this print I added a few swipes of Gesso beneath my sentiment (Penny Black 30-226 Kind Words). I also added a touch of Brushed Corduroy Distress ink to the entire Art Square.  I embellished using Penny Black's Creative Die 51-014 Nature's Song (the same one I used for my mask when making the print).  I also added another Art Square, this one being a 1 x 1 inch Inchie which was stamped with Penny Black 30-217 Belle Fleurs and colored using Art Grip Aquarelle Watercolor Pencils.
For my second print, I repeatedly stamped Penny Black 30-213 Bouquets using Ranger Archival ink in Jet Black. I stamped directly on my Art Square and also onto white cardstock.  I painted the leaves and stems using acrylic paint, painting directly onto the Art Square.  I then colored the flowers and buds on the cardstock using Stamper's Big Brush Pens, cut them out, and adhered to the Art Square surface.  Once all of the flowers and buds were glued down, I added Gathered Twigs Distress ink as well as Gesso along the edges of the Art Square.  Pearls, twine, and a sentiment (Penny Black 30-228 Blooming Tags) were added to finish things off. 

Thanks for visiting and see ya next week... we've got another Gelli Arts technique we just can't RESIST showing you!

Gelli Plate Technique 1, Project Reveal: Elizabeth

Join us over the next few weeks as we explore making colorful prints using a Gelli Arts Gelli Plate.  We've even slid our art tables side-by-side and took pictures for you each step along the way!  Not only that, the fun continues as we share our “reveal” posts showing how our individual prints were transformed into creative projects.

Additional Gelli Arts Inspiration on their BLOG and FACEBOOK PAGE
Basic technique inspiration found HERE

These were my final prints created from the Basic Technique demonstrated "here".

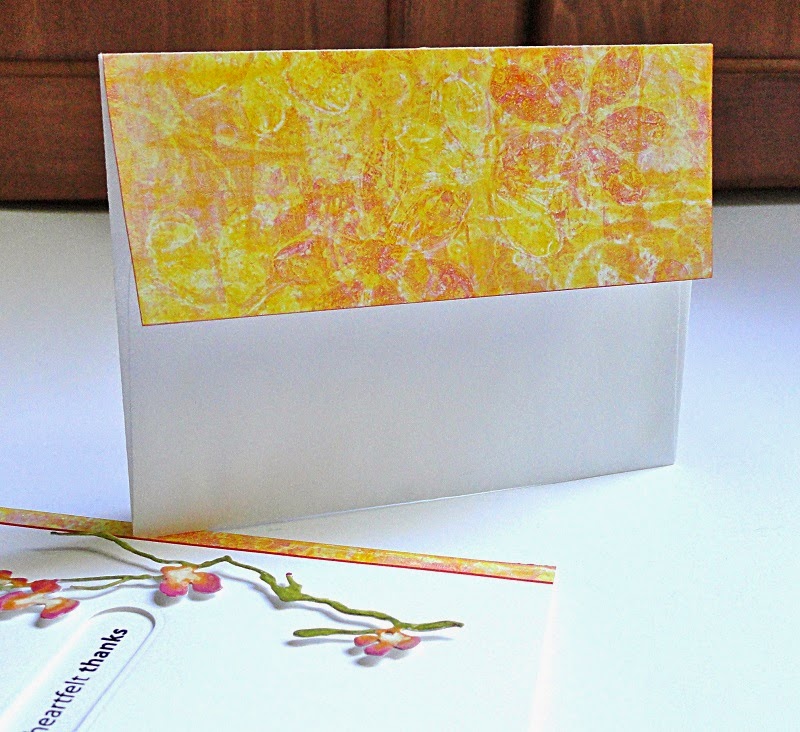
Today I am using the ghost print on the right for a greeting card with a matching envelope.

A thin strip trimmed from the ghost print was used as decorative edging along with a second accent strip from Fall Festival Mix & Match Cardstock.  

Another larger section was added to the envelope flap to coordinate with the card

Penny Black's Creative Die "Dancing Blooms" was die cut twice from white cardstock and stacked together for a thicker embellishment.  The delicate flowers were then colored with Ranger's Distress Paints (Wild Honey, Picked Raspberry and Peeled Paint) with highlights in Dr. Ph. Martin's Bleed Proof White.  I love this opaque white watercolor for superb coverage. 

A small die-cut window was added with a tag from Penny Black's Creative Die set called "Tagged".  The sentiment (Amazing) is stamped in Onyx Black VersaFine and heat embossed with clear powder.  I really like pairing opposing visual dimensions next to each other as seen with the recessed sentiment and the elevated blooms.

These pulled prints are exquisite and can be made with stamping and die cutting supplies.  Can you spot Penny Black's Dotted Fusion and Pinwheel in this printed paper?

One of the fun results of the printing process is that two prints are created.  One in bold/bright tones and a second in soft/muted hues.

  Don't miss Jill's reveal coming next! 

[Supplies: Gelli Arts: Gelli Plate; Penny Black: Amazing 30-243, Dotted Fusion 40-278, Dancing Blooms 51-047, Tagged 51-007, Pinwheel 51-026, Fall Festival Mix & Match Cardstock 16-003; Ranger: Picked Raspberry, Wild Honey, Peeled Paint Distress Paints; Acrylic Paints: Yellow Deep, Light Magenta; Dr. Ph. Martin’s Bleed Proof White; Golden: Open Acrylic Gel; Imagine Crafts/Tsukineko: Onyx Black VersaFine, Clear Embossing Powder, Creative Medium]


Gelli Plate Techniques, 1 of 4: Basics

Join us over the next few weeks as we explore making colorful prints using a Gelli Arts Gelli Plate.  We've even slid our art tables side-by-side and took pictures for you each step along the way!  Not only that, the fun continues as we share our “reveal” posts showing how our individual prints were transformed into creative projects. 

Additional Gelli Arts Inspiration on their BLOG and FACEBOOK PAGE
Basic technique inspiration found HERE
If the Gelli Plate is new to you, the surface provides a platform to apply paints and inks from which you can press your paper and pull a print. This type of art was new to us (and even a little scary-LOL), but anything is easier with a friend; right? 

Here we go... 


Isn't it fun how each finished print turned out differently even though we were following the same steps? Now what will we create with our prints?  Stay tuned...


Introducing Gelli Arts

We promised the reveal of our next featured product so here ya go...
We can't wait to kick things off next week  with fun tutorials on "monoprinting without a press" and inspiration for going one step further and using your prints in your artwork.  


Painted and printed...

Things are getting painted and printed here in the Studio.  There are acrylic paints, brayers, Art Squares, wax paper, and stamps all over the place!
We're off to continue creating at our art tables BUT we'll be back on Friday with the reveal of our next featured product. Until then...


Out & About with Jill

Penny Black and Faber-Castell Design Memory Craft are teaming up this week and we're excited to be...
..taking part in the fun!
 
Here's a look at Jill's project:

Visit the Penny Black blog to view the PB&J Video.

Oh, we heard through the grapevine there is a giveaway so you may want to head over and check it out so some Penny Black stamps and Paper Crafter Crayons can come to live in YOUR studio!
Click HERE for details. 


Out & About with Elizabeth

Penny Black and Faber-Castell Design Memory Craft are teaming up this week and we're excited to be...
..taking part in the fun!
 

Here's a look at Elizabeth's project:

Visit the Penny Black blog for details and instructions.

Oh, we heard through the grapevine there is a giveaway so you may want to head over and check it out so some Penny Black stamps and Paper Crafter Crayons can come to live in YOUR studio!
Click HERE for details.