Showing posts with label From This To That. Show all posts

Floral Happiness with Elizabeth

There all kinds of floral ideas blooming in the Studio.  Join us as we share our bouquets of colorful happiness.


My floral journey started here:

This was a gift given to me and my husband at Christmas.  This canvas bag contained a cellophane wrapped package of delicious pistachios.  The bag was fabulously constructed and I couldn't part with it after removing the nuts.  I instantly thought it could be art-cycled!!!  The reverse side had nutritional and manufacturing information so both sides needed a makeover.

Which lead to this:
Side A
Side B
The majority of colorful mediums I used included lots of white and clear Gesso, acrylic paints mixed with a textile medium, VersaCraft Inks, VersaMagic Inks, StazOn Inks, Faber-Castell PITT Big Brush Pens, a white paint pen and a heat tool.

Some images might not be overly visible, but they added immense depth and texture to the overall design.  Other images were used as a base to do some freestyle painting.

These are some of the Penny Black stamps and stencils you might spot throughout the design.


Get your vases ready.  Jill will be sharing her beautiful bouquets next.


From This To That with Elizabeth

Hello Everyone...
Welcome to another segment of   

I started FROM THIS…
Inchie Arts NEW 2 x 4 Swatches in white and decorative paper napkins.

…and transformed them TO THAT.
Let me pause for a moment to interject how much fun I had making these colorful little canvas cards.  Please keep my secret on how quick and easy these were to create.

Tall and narrow cards are some of my favorites and these Inchie Art Swatches snuggle on top of a 2.75 x 4.75 card base so lovely.

All you need to do is cut the napkin to the size of the Swatch and peel away the second ply of paper.  (You will want to use the top colorful portion.)  Paint a thin coat of matte medium (or Mod Podge) on the Swatches, apply the cut napkin and gently smooth the two together.  Let dry and add additional coats of matte medium.  I used a heat tool to speed up the process, but made sure not to have the heat too close to the Swatch to prevent the matte medium and napkin from bubbling/burning.  If you want to cut the napkin larger than the SWATCH, you can always trim away any excess after the piece has dried.

The Inchie Arts Swatches are fabulously sturdy and don’t warp when applying several layers of matte medium.  Plus, the sumptuous thickness gives the project nice dimension eliminating the need to use dimensional foam tape.

To finish the design, the edges of the Swatches were inked with Delicata Golden Glitz ink using the direct-to-paper method.


The cute little sentiment tabs were created by die cutting white labels (Penny Black - Tagged 51-007) and stamping the greetings (Penny Black - Snippets 30-283) in Onyx Black VersaFine.

Now you can use your decorative napkins 
to entertain AND craft!! 

Looking for additional Inchie Arts inspiration and projects?
Be sure to visit their BLOG and FACEBOOK page. 
You can also view a fabulous video by my pARTner, Jill, (HERE) which also features the new Inchie Art SWATCHES.


From This to That: Elizabeth

You never know when we will find something in the STUDIO that will inspire us to take a trans-formative artistic journey from this to that.  Come take a peek...


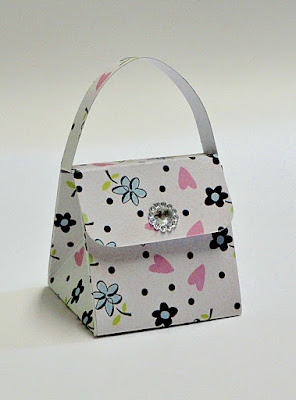
From Penny Black's Coco Style Designer Paper, Tombow's Hook & Loop Tabs and some fancy bling...


...to a fancy dimensional purse!
( 2.5  x  1.5 )
Simply trace your favorite templates onto 
patterned cardstock, cut and fold.  
Viola - instant cuteness!
  
What to add extra sweetness?  
Fill with chocolate confections.

I created this template design myself, but you can find many inspirational patterns on the web.

I really like the weight of Penny Black's designer papers.  Easy enough to score and fold with just the right amount of weight to keep the finished design sturdy and hold its shape.

Check out all their fabulous paper pads HERE.  
The design selection is amazing.


From This - To That: Elizabeth

You never know when we will find something in the STUDIO that will inspire us to take a trans-formative artistic journey from this to that.  Come take a peek...


From this...
Duct Tape and Black Fabric

To That!
A double-pocket, mixed media wallet
Making dimensional projects is a passion of mine.  I enjoy the process of translating the idea into components and engineering the patterns. 

To begin, I covered one side of a piece of black fabric with duct tape then trimmed it into a rectangle.  

Folding each end toward the center created the fabric-lined pockets with a duct tape exterior.  The "no-sew" aspect to secure the sides was accomplished with thin strips of duct tape.

After a few initial applications of white gesso over the exposed portions of duct tape, I used many layers of Dr. Ph. Martin's Hydrus watercolors, Faber-Castell Gelatos and medium gel mat.  All those fun images stamped in Jet Black StazOn and white acrylic paint are from Penny Black's transparent set called "Sentiments".

This particular design was sized to hold credit cards, 
a driver's license and paper currency.  

These are also great as pretty packaging to give a gift card.
After the gift card has been used, the recipient has a wonderful (and functional) keepsake for their purse.


From This - To That: Jill

You never know when we will find something in the STUDIO that will inspire us to take a trans-formative artistic journey from this to that.  Come take a peek...

Oh boy, I really can't tell you how much fun I had transforming THIS--a piece of an old box:
TO THAT--a set of four ATC's:
To begin the transformation, I randomly ripped up the top layer of of the cardboard revealing the yummy texture beneath.  Next I painted the entire piece using acrylic paints.  I loved that since I was working on an old box, I was not afraid to jump right in and paint away.  I kept thinking, so what, if this turns out hideous, I can just throw it away!
When I was finished painting, I remembered THIS inspiration I had seen on Pinterest which lead me to the decision to cut the piece into four small ATC-size pieces.  I added additional lighter acrylic paint to these, sometimes spraying the wet paint with water and allowing it to drip.  I also added washi tape, stamped hearts (Penny Black 30-204 Heart Swatches) and a sticker sentiment (SRM #53001 Happy).  I just couldn't resist using the word "happy" with all of these bright colors.  Perhaps these ATC's would look cute on a gift bag (punch a hole in the top and tie on with ribbon), mounted to a card to wish someone happy birthday, or I think I just might prop one up by my computer screen as a reminder of happy, artsy times.  


Wanting more From This To That?  I might (wink, wink) have spied Elizabeth transforming something else here in the Studio... 

From This - To That: Elizabeth

You never know when we will find something in the STUDIO that will inspire us to take a trans-formative artistic journey from this to that.  Come take a peek...


From this....


To that!
I would like to introduce you to Ginger.  
She has been running around in my mind and I finally brought her to life.

Here's a look at my process...
The sculpture began by creating the basic form.  The head and body were developed from cardboard, cotton and tinfoil.  Straws were added for legs and the painter's tape created an overall foundation to apply modeling paste.

Sanding occurred between the layers to create smooth transitions.  An application of white gesso prepared the finished form for painting.


Ears, eyes and horns were fashioned from clay.


A combination of diluted acrylics and Faber-Castell Stamper's Big Brush Pens were my coloring mediums.

The tail is painter's tape rolled around tin foil.  
The finished sculpture is 7 inches tall.

Adding medium gel mat between the coloring applications gave the piece a wonderful texture and finish.  

Ginger has a friend too!


This is Polly.
She was created using the same materials.  Her "poofy" body is made up of over 90 pom poms that were rolled in white gesso.  Woolly highlights were added with a grey Faber-Castell Stamper's Big Brush Pen.

I couldn't resist tucking in this little tail.

Baa, baa, black sheep,
  Have you any wool?
  Yes sir, yes sir,  
Three Five bags full!

Stay tuned to see what Jill has transformed!